Five Common Findings in CSI – Lintels and Masonry Mortar (Part 2 of 3)
In Part 1 of CSI we discussed the deterioration of both steel windows and wood windows, which is one of the five most common findings during Easements Atlanta’s Conservation Site Inspections. There isn’t necessarily an order to the “Big 5,” but the topic of windows inspired the next installment of two more common findings: lintels and masonry mortar.
Lintels
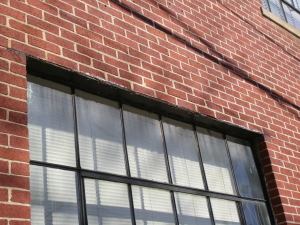
Just above every window and door opening is a header, or in masonry buildings, a lintel. For buildings constructed in the 1890s to present, the lintel is usually fabricated of steel, wrought iron or cast iron that stretches across the top of a window opening and structurally supports the façade wall. It’s possible to have window and door openings within masonry facades because of the support provided by the lintel. Historic lintels that are exposed to the elements over time will begin to corrode if they aren’t maintained.
There are eight recognized types of corrosion, but the two frequently seen during CSI is intergranular corrosion and stress corrosion. Intergranular corrosion usually initiates at unpainted or unsealed edges or holes of susceptible metals, like steel or iron. Stress corrosion is cracks within the metal due to the combined action of general corrosion and applied tensile stress, such as the weight of a masonry wall. The lintel must be able to resist moisture at its edges and at joints with masonry, otherwise intergranular corrosion causes the steel to expand at its edges and stress corrosion causes the lintel to sag. Both types of corrosion will affect the surrounding masonry, visible in step-crack patterns, brick displacement, or window distortion under the pressure.


To keep corrosion from forming or to keep it from becoming a larger issue, remove any old sealant; then with a wire brush remove rust from the steel lintel; protecting surrounding masonry, follow with a red oxide primer and exterior paint; and finish with a new application of caulk suitable for exterior masonry between the lintel and brick (polyurethane or elastomeric types are good choices for this application). However, if intergranular or stress corrosion are already quite visible, those steel lintels will need to be replaced and the surrounding masonry repaired by qualified masons.
Masonry Mortar
Mortar has been used as an integral part of masonry structures for thousands of years, but the composition of mortar has changed, especially over the last 200 yrs. For masonry buildings in EAI’s portfolio, mortar compositions can range from pure lime and sand mixes to a wide variety of lime, portland cement, and sand combinations. Often other ingredients, such as brick dust (see Schoolhouse Lofts), clay, natural cements, pigments, and even animal hair were also added to mortar. It’s important to note the use of portland cement was uncommon until the early 20th century, but even then it was a minor ingredient used to accelerate mortar set time. It’s equally notable to highlight the change in brick composition, too, when soft hand-made or molded bricks were superseded by machined hard-core brick. Although generally considered “permanent,” masonry is subject to deterioration, especially at the mortar joints where some repair will be needed.

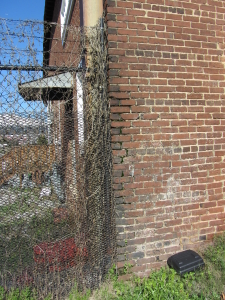
The root cause of mortar deterioration observed by the CSI team points to leaking roofs, settlement of the building, capillary action triggering rising damp, and extreme weather exposure. Without appropriate repairs to eliminate the source of the problem, mortar deterioration will continue and any repointing will have been a waste of time and money. Repointing is the process of removing deteriorated mortar from the joints of a masonry wall and replacing it with new mortar. Properly done, repointing restores the visual and physical integrity of the masonry. Improperly done, repointing not only detracts from the appearance of the building, but may also cause deterioration of the masonry units themselves.
Some improper repairs noted by the CSI team is the use a synthetic caulking compound, full-strength premixed bagged portland cement, a scrub coating technique and surface grouting. Improper repairs change the width or joint profile or, worse yet, the compressive strength and porosity of the mortar joint. A proper repointing job will include a historic mortar analysis and completing a test panel. The exact physical and chemical properties of the historic mortar are not of major significance as long as the new mortar matches the historic mortar in color, texture, and detailing; is softer (measured in compressive strength) than the brick; is as soft, or softer (measured in compressive strength) than the historic mortar. Thus, the compressive strength of mortar corresponds with the compressive strength of the historic brick, otherwise masonry cracks and spall will occur.


It is important to remember that mortar joints are intended to be sacrificial and will probably require repointing some time in the future. A good repointing job is meant to last at least 30 years, and preferably 50- 100 years. If the historic mortar joints proved durable for many years, then careful repointing should have an equally long life, ultimately contributing to the preservation of the entire building.
Remedial resources for masonry mortar and repointing techniques.
Additionally, there are several labs in Georgia that perform historic mortar analysis and provide recommendations to match the mortar composition. Contact EAI for a current list.
Next week in Part 3, I’ll share the final two common findings during our inspections that concern site drainage and graffiti, and resources for remedies.
